|
|
HISTORICAL MINIATURES BY GEORGE GRASSE |
|
|
|
HISTORICAL MINIATURES BY GEORGE GRASSE |
|
|
MORANE-SAULNIER TYPE AI SWISS AIR FORCE 1918 |
by George Grasse
SPECIAL HOBBY 1:48 SCALE PLASTIC INJECTION KIT S04899 MORANE-SAULNIER TYPE AI (MoS.30 E1)

| SPECIAL HOBBY MORANE-SAULNIER TYPE AI BOX ART |
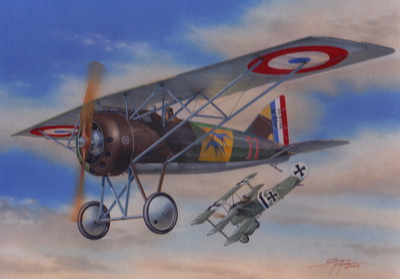 |
| The Special Hobby 1:48 scale injection molded kit of the French Morane-Saulnier Type AI MoS.29 models the fighter aircraft developed by the French in late 1917 to replace the Spad 7. However, it was plagued with structural problems, received negative press, and, by the time the upgraded Spad 13 appeared, the Morane-Saulnier Type AI was a "dead duck" and never equipped more than a handful of French Escadrilles from March to May 1918. The aircraft had a life as a trainer under the designation MoS.30 E1 of which 51 were used by the U.S. Air Service at Issoudun in 1918 as an advanced aerobatic trainer. Sometime in late 1918 or early 1919, one Morane-Saulnier AI MoS.30 E1 appeared in Switzerland, the provenance of which is unknown and Swiss Air Force archives do not mention this aircraft. 1 |
| MORANE-SAULNIER TYPE AI PHOTO |
 |
|
This photo is credited to Albatros Publications,
Windsock Mini Datafile 5, page 10, via John R. Carlson. It
shows the only known Morane-Saulnier Type AI MoS.30 E1 in
Switzerland. The individual standing next to it is Léon
Progin, a test pilot for the Swiss air force and a test pilot of the
Eidgenössische Konstruktionswerkstätte (K+W) Thun. He
purchased this aircraft
privately from France in March 1920. However, he was killed while attempting a risky
maneuver at a public air show demonstration on 21 November 1920 in
Tafers, Switzerland. This aircraft appears in Swiss national markings; those on the wings were painted over the French roundels and a similar style marking was added to both sides of the rudder. The aircraft is not armed. It is finished in the French 1918 five-color camouflage scheme with blanc bleuté (aluminum dope) on the under-surfaces, wheel covers, and landing gear struts (except outer facings). Note the Morane-Saulnier logo on the cowling. 2 |
| CONSTRUCTION PHOTO #1 (4 April 2011) |
%20Morane-Saulnier%20Type%20AI%2001.jpg) |
|
This is the beginning. Note the "enduit
metallise" (aluminum dope)
wheel covers were painted in Misterkit MKFC01 French Aluminum. The
cockpit wood components are painted in Vallejo VC0824 German
Camouflage Orange Ochre stained with Vallejo VC0872 Chocolate Brown.
The metal framing is Misterkit MKFC02 French Roundel Blue. The
interior of the fuselage is Misterkit MKFC04 French CDL.
Later, the area to the beginning of the cockpit towards the front
was re-painted in the French Aluminum cover to represent the sheet
metal paneling from the inside. The engine was built straight from the kit except that the copper-colored intake pipes were scratch-built from thin brass rod. The propeller was done in the colored pencil technique applied over a ochre base coat striped in a medium brown to represent the laminations. |
| CONSTRUCTION PHOTO #2 (25 April 2011) |
%20Morane-Saulnier%20Type%20AI%2002.jpg) |
| The fuselage halves were glued together and allowed to dry overnight. The next day, I applied putty to the seams and let that dry overnight. Using 400 flex sanding cloth, I removed the excess putty without damaging the surface detail. The engine cowling had one small piece to glue, putty, and sand. I then painted the interior with Vallejo VC0865 Oily Steel then primed the outside. I measured how the rotary engine would fit against the firewall and project out into the cowling. I had to add a spacer which is the pale yellow colored plastic at the front of the fuselage. |
| CONSTRUCTION PHOTO #3 (25 April 2011) |
%20Morane-Saulnier%20Type%20AI%2003.jpg) |
| The next task was to glue the fin/rudder on, get it aligned, and allow it to dry overnight. Then I measured the kit's plastic tail struts and cut equivalent pieces from Strutz material. Then I glued each stabilizer/elevator in place and secured them with the brass Strutz rods. I glued the PE stitching part to the underside as per Mini Datafile 5 drawings and photos. These were primed. |
| CONSTRUCTION PHOTOS #4a & 4b (27 April 2011) | |
%20Morane-Saulnier%20Type%20AI%2004a.jpg) |
%20Morane-Saulnier%20Type%20AI%2004b.jpg) |
| The landing gear was completely scratch-built in brass for strength. The first step was to match the Datafile GA and, using one piece of Strutz for each side, I bent the material into the correct angle. After trimming and cutting, I nipped the ends, drilled out the holes in the fuselage, and, with a little more trial and error fitting, got the struts to work. I cut a piece of brass rod for the axle and glued it into place. The one part I did use from the kit was the shock absorber on the end of each axle as shown on the farthest wheel. I made a "V" support strut from Strutz. The other brass component in this view is the foot step. | This view shows the tailskid and its small supporting strut in place. Both were scratch-built: the tailskid from Strutz material and the support from brass rod. The top deck in front of the pilot's cockpit has been "faired over" to represent the Swiss type-testing machine that was probably unarmed. I glued in the single machine gun deck because it covered most of the area and conformed to the "hump" near the front. Then I filled the machine gun trough with putty and let it dry. It was sanded and then "polished" with 400 grit flex sand paper and primed. The white object just behind the pilot's cockpit is manufacturer's plate. |
| CONSTRUCTION PHOTO #5 (12 May 2011) |
%20Morane-Saulnier%20Type%20AI%2005.jpg) |
| The fuselage and tail unit have been completed and painted. The camouflage scheme is based on the actual French Morane-Saulnier camouflage guide reproduced in Windsock Mini-Datafile 5 for the Morane-Saulnier Type AI. This is the late-war French 5-color camouflage scheme as applied to their combat aircraft. The colors and the corresponding paints I used are shown in the table below. One point I'd like to note here is that period photographs interpreted brown as a darker shade than it actually was. It's just the nature of the film used and the warm reflective qualities of the color. |
TABLE OF FRENCH 5-COLOR CAMOUFLAGE PAINTS
| FRENCH COLOR | ENGLISH | PAINT # | PAINT SWATCH |
| Vert Foncé | Dark Green | Misterkit MKFC11 |
 |
| Vert Clair | Light Green | Misterkit MKFC12 |
 |
| Braun | Chestnut Brown | Misterkit MKFC05 |
 |
| Jaune | Beige Yellow | Misterkit MKFC10 |
 |
| Noir | Black | Vallejo VC0950 |
 |
| CONSTRUCTION PHOTO #6 (12 May 2011) |
%20Morane-Saulnier%20Type%20AI%2006.jpg) |
| This side view shows the 5-color camouflage scheme in a different lighting. Shadow lines lines on the fuselage and tail unit have not been done yet. Note the landing gear struts and wheel covers. These and all undersurfaces of the fuselage, tail unit, and wing are painted in Misterkit MKFC01 French Aluminum which represents the aluminum pigmented dope known as enduit métallisé. As with all colors, metal components had a matching shade in an enamel-based paint. The difference in shades was slight and not noticeable in 1:48 scale. |
| CONSTRUCTION PHOTO #7 (4 June 2011) |
%20Morane-Saulnier%20Type%20AI%2007.jpg) |
| This later version of my work-in-progress has a modified "brown" to the 1918 five-color camouflage scheme. This is Misterkit MKFC08 Medium Brown that replaces MKFC045 Chestnut Brown which did not seem right. The photo under these lighting conditions does not show the substantial difference in the brown paint used. The rudder appears to have been over-painted to eliminate the French rudder stripes; then, a red disc with the white cross was added. All of the fuselage colors are finished. Most features have been highlighted using a brown-black color. The outside facing of the landing gear struts were painted to match the camouflage color on each side of the fuselage, e.g., port side is brown, starboard side is light green. The rest of the landing gear, the wheels covers, and the fuselage underside are painted in blanc bleuté, a dull mix of white and aluminum powder to which a small amount of blue has been added. |
| CONSTRUCTION PHOTO #8 (30 June 2011) |
%20Morane-Saulnier%20Type%20AI%2008.jpg) |
|
Much has
transpired since photo #7 of early June. I was greatly
disappointed at the flimsy plastic wing struts supplied in the kit
but could not make myself proceed until I worked out a good
substitute. Some of my models are sold and have to be shipped.
Structurally weak components absolutely NEVER make it through the
shipping process. If you look carefully at the photo of the
wing struts you will notice two colors: brass and light gray.
The only strut parts used from the kit are the short light gray
plastic pieces that do not have any load bearing characteristics
located midway and perpendicular along the long outer wing struts. Building the struts was tedious but actually simple in concept. I used Griffon Models hollow brass tube (GCP-BHP05) measuring 1.2mm OD (outside dimension) and .96mm ID (inside dimension). A solid brass rod measuring .81mm diameter was inserted into the tube for two purposes: 1) the rod protrudes from either end of the tube to serve as attachment points, and 2) the rod prevents the tube from being crushed by the necessary process of pounding the tube into an oval shape. |
| CONSTRUCTION PHOTO #9 (30 June 2011) |
%20Morane-Saulnier%20Type%20AI%2009.jpg) |
|
This right
rear view shows the attachment of the tail unit bracing wires each
of which are connected to photo-etched "turnbuckles". The
slight sagging is easily adjusted by bending the turnbuckles back
into position.
I have received a number of photos from Alan Toelle showing late-war and post-war Morane-Saulnier AI (MoS E.1) training aircraft built to the same specifications as the Swiss example which I am building here. All of these photos show the outer facings of the landing gear struts to be painted in the camouflage color of its corresponding forward fuselage, e.g., the starboard outside strut is painted light green and the port outside strut is painted brown. The remainder of the landing gear struts are painted in the enamel (or Ripolin) version of "blanc bleuté" which has a reduced percentage of aluminum powder in its pigmented mix and should not be as reflective as the aluminum doped (or Acellos) version used on fabric. Thus, technically, the metal and wood components not covered by fabric should be a light gray color corresponding to aluminum but without reflective qualities. None of the photos I reviewed were conclusive as to a particular camouflage color being applied to the wing struts in the same manner as applied to the outer facing surfaces of the landing gear struts. There doesn't seem to be darker colors than light gray - it's just not conclusive to me. Therefore, the wing struts, which are faired aluminum covering the underlying steel tubing, are to be painted in light gray. |
| FINISHED PHOTO #10 (5 July 2011) |
%20Morane-Saulnier%20Type%20AI%2010.jpg) |
| This left side view shows the completed aircraft. |
| FINISHED PHOTOS #11 & #12 (5 July 2011) | |
%20Morane-Saulnier%20Type%20AI%2011.jpg) |
%20Morane-Saulnier%20Type%20AI%2012.jpg) |
| These two photos illustrate two major last-minute changes. The first had to do with covering up the seven ventilation holes on the engine cowling. Compare the original photo below left with Photo #8 below right. This was an oversight that I should have caught at the beginning. The holes were plugged with putty and sanded four times with 400 grit flex sanding cloth to get a smooth finish. The other modification at the collector's request was changing the wing strut color from Ripolin blanc bleuté which I argued FOR in Photo #9's caption to a wood color which I argued AGAINST. The struts were secured in fittings which I painted medium blue. | |
|
|
|
| FINISHED PHOTOS #13 & #14 (5 July 2011) | |
%20Morane-Saulnier%20Type%20AI%2013.jpg) |
%20Morane-Saulnier%20Type%20AI%2014.jpg) |
| Right rear and left rear views. | |
| FINISHED PHOTOS #15 and #16 (5 July 2011) | |
%20Morane-Saulnier%20Type%20AI%2016.jpg) |
%20Morane-Saulnier%20Type%20AI%2015.jpg) |
-----------------------------------------------------------------------------------------------------------------
FOOTNOTES
1 Bruce, J. M. Morane-Saulnier Type AI Windsock Mini Datafile 5, Albatros Productions. Photo credit on page 10 is John R. Carlson. The withdrawl of the AI from combat Escadrilles MSP.156, MSP.158, and MSP.161 was the result of a number of accidents attributed to structural failure and, by early June 1918, none remained on combat duty. As to their use as trainers, Morane-Saulnier replaced the trouble-some 150 hp Monosoupape 9NB rotary engine with more reliable engines but to no avail. The U.S. Air Service purchased 51 as trainers powered by the 90 hp Le Rhone 9Jby rotary engine. It is not known which engine powered the lone Swiss version but thought to be the larger 120 hp Le Rhône.
2 Davilla, James J. Dr. and Arthur M. Soltan. French Aircraft of the First World War. Boulder, Colorado: Flying Machines Press. This source estimates that between 1,050 and 1,200 of all versions were built so it seems that it was a serious contender for a while.
Toelle, Alan. Various Email exchanges, May 2011.
BIBLIOGRAPHY
Bruce, J. M. Morane-Saulnier Type AI Windsock Mini Datafile 5. Berkhamsted, UK: Albatros Productions, 2002.
Davilla, James J. Dr. and Arthur M. Soltan. French Aircraft of the First World War. Boulder, Colorado: Flying Machines Press, 2002.
Toelle, Alan. Various Email exchanges, May 2011.
GO TO?
