|
|
HISTORICAL MINIATURES BY GEORGE GRASSE |
|
|
|
HISTORICAL MINIATURES BY GEORGE GRASSE |
|
|
BRITISH SOPWITH F.1/3 CAMEL 'COMIC', No.44 HOME DEFENCE SQUADRON, 1918 |
by George Grasse
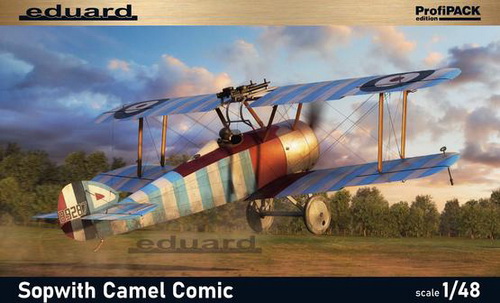
EDUARD 1:48 SCALE PLASTIC INJECTION MOLDED KIT EU82175 OF THE SOPWITH F.1/3 CAMEL COMIC
|
EDUARD
EU82175 BOX ART
|
 |
|
SOPWITH F.1/3 CAMEL COMIC 3-VIEW
|
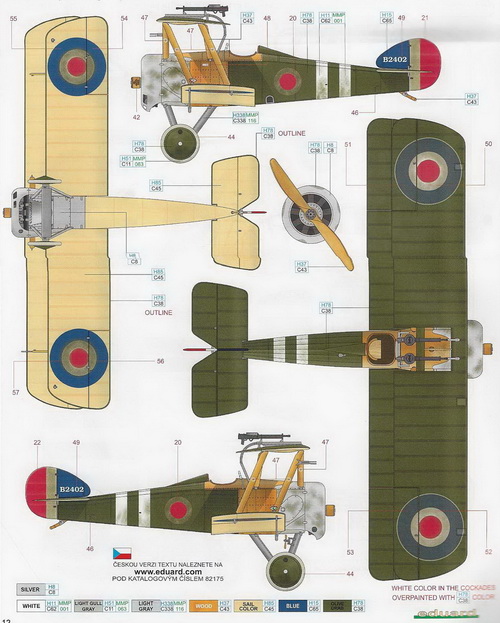 |
| This multi-view drawing is taken from the Eduard EU82175 'Comic' kit, 'B' option color scheme and decal placement. Two top wing mounted Lewis guns required that the cockpit be moved back so the pilot could manage Lewis guns on their rail. Note that the designation for this 'comic' version is F.1/3. |
|
THE
MODEL TO BE BUILT
|
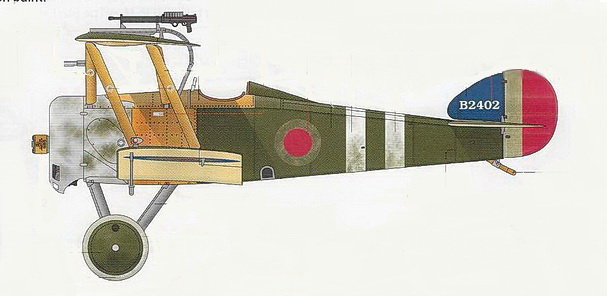 |
| The model to be built is Sopwith F.1/3 Camel 'Comic' serial B.2402 flown by Captain George Henry Hackwill, No.44 (Home Defence) Squadron, serving as a night fighter against raiding German bombers and dirigibles in and around London. Note the smudging (probably PC.10 or PC.12) to reduce the bright presence of markings at night. This profile is credited to an un-named Eduard staff artist. |
|
PHOTO OF THE
MODEL TO BE BUILT
|
.jpg) |
| This photo is from page 8 of the Albatros Productions, Ltd, book Sopwith Camel Squadrons by L. A. Rogers, page 8. It is Sopwith F.1/3 Camel 'Comic' serial B.2402 flown by Captain George Henry Hackwill, No.44 (Home Defence) Squadron. |
|
CONSTRUCTION PHOTO No. 1
|
%20Sqdn%20(8303)%2001.JPG) |
| The first steps begin with painting the interior fuselage halves. The far right represents the aluminum panels using Tamiya XF-16 Flat Aluminum. Next, is the brown paneling in Vallejo 876 Brown Sand. Lastaly, the simulated fabric using Vallejo 976 Buff. The left and right strucural members include attached throttle quadrant (left side - upper image) and pressure pump (right side - lower image). This framework was painted in Vallejo 856 Ochre Brown. |
|
CONSTRUCTION PHOTO No.
2
|
%20Sqdn%20(8303)%2002.JPG) |
| Closeup of the cockpit interior after fuselage halves have been joined. |
|
CONSTRUCTION PHOTO No.
3
|
%20Sqdn%20(8303)%2003.JPG) |
| The lower wing, tail horizontal stabilizer, tail vertical stabilizer (not visible), rotary engine, and cowling are now in place |
|
CONSTRUCTION PHOTO No.
4
|
%20Sqdn%20(8303)%2004.JPG) |
| I have decided to procede with the fusilage to including painting and decals. Starting at the cowling, it is painted in Vallejo 864 Natural Steel. Next the wood work is Vallejo 929 Light Brown followed by the main fuselage section which is Vallejo 887 Brown Violet. The vertical fin is Vallejo 899 Dark Prussian Blue. Barely visible are the landing gear struts which are Vallejo 990 Light Grey. The wheel covers are Brown Violet. |
|
CONSTRUCTION PHOTO No.
5
|
%20Sqdn%20(8303)%2005.JPG) |
| The model has been over-sprayed with satin polyurethane. Fuselage decals are added. The two white stripes were not included on the kit's decal sheet so I made two strips from white decal paper. Not visible are the "Lift Here" decals in black under the horizontal stabilizer |
|
CONSTRUCTION PHOTO No.
6
|
%20Sqdn%20(8303)%2006.JPG) |
|
The landing gear struts are
made of brassT tube and rod with select details cut from
the kit's plastic landing gear struts and glued to
these. A makeshift axle airfoil was similarly built and
glued in place. The fuselage struts as shown are also brass tube and rod replacements. These were immediately fitted and tested for propper height and alignment. Then, they were glued in place. The top wing was fitted to the struts and alignment was checked. Then, the top wing was glued to the fuselage struts. |
|
CONSTRUCTION PHOTO No.
7
|
%20Sqdn%20(8303)%2007.JPG) |
| The outer wing struts were taken directly from the kit. Wide strips of modeling masking tape were applied to the two wings to hold them in place while the struts completely cured. The fuselage struts and wing struts had simple 'X' rigging done first. All of the other rigging points consisted of double strands of .006 MFT. The front fuselage struts have a unique rigging pattern to be covered in the next photo panel. |
|
CONSTRUCTION PHOTO No.
8
|
%20Sqdn%20(8303)%2008.JPG) |
| All of the rigging including ailerons and the tail unit is completed though difficult to see in this photo. Final decal application includes wing roundels and strut logos. A thin overlapping coat of PC.10 has been applied to the wing undersides. |
|
CONSTRUCTION PHOTO No.
9
|
%20Sqdn%20(8303)%2009.JPG) |
| Smudging of the white areas was done to improve night camouflage for this Home Defence fighter. |
