|
|
HISTORICAL MINIATURES BY GEORGE GRASSE |
|
|
|
HISTORICAL MINIATURES BY GEORGE GRASSE |
|
|
HANNOVER CL.II C.9280/17 of FA(A) 282, WESTERN FRONT, WINTER 1917/1918 |
by George Grasse

EDUARD 1:48 SCALE MULTI-MEDIA KIT BUILT FROM EU8008 HANNOVER CL.IIIa
|
EDUARD
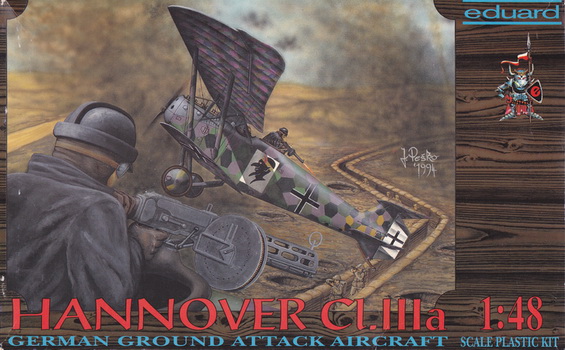
HANNOVER CL.IIIa BOX ART
|
 |
|
According to information printed on the box side, this kit was issued in 1995 and contains the early component style of Eduard of the Czech Republic. The basic components of fuselage halves, wings, tail unit, landing gear, and struts are plastic injection molded. The kit is supplemented by white metal castings for the engine, PE sheet for the complete interior, decal sheet to build two specific aircraft, and two more decal sheets of 4-color upper and under surface day pattern pre-printed camouflage fabric all of which are shaped to fit all flying surfaces so no cutting and sizing is required. The sheets also include pink rib tapes for the under surface and dark blue for the upper surface. The printing of the camouflage pattern seems too dark. There are five sheets of step-by-step instructions plus two full-color guides for detailing each of the two aircraft. |
|
CONVERTING THE KIT FROM THE
CL.IIIa TO THE CL.II
|
|
This project will use the Eduard kit for the Hannover CL.IIIa and converted to build the Hannover CL.II C.9280/17 of FA 32 flown by Flugzeugfuhrer Unteroffizier Gfor (P) and Leutnant Gronhagen (O), based at Sierenz, on the Western Front, during the winter of 1917/1918. My reason for building the model as a Hannover CL.II fits my rule of knowing the crew, unit, serial number, markings, date, and circumstances. I generally prefer the Eisernes Kreuz (Iron Cross) insignia over the late-war Balkenkreuz insignia. Lastly, the conversion is quite simple because the distinguishing features of the CL.II and CL.IIIa are, at first sight, nearly indistinguishable. The features are 1) the ailerons; 2) the vertical tail struts; 3) and minor measurements as to fuselage and flying surface dimensions. More historical detail can be found in my Historical Miniatures Journal No. 18.
Hannover CL.II C.9280/17 from Das Propellerblatt, Nummer E.1, 2006. Ltn Gronhagen (O) standing in the observer's cockpit, Uffz Gfor (P) standing the two mechanics assigned to this aircraft. |
|
CONSTRUCTION PHOTOS No. 1a
and 1b
10 June 2013
|
|
 |
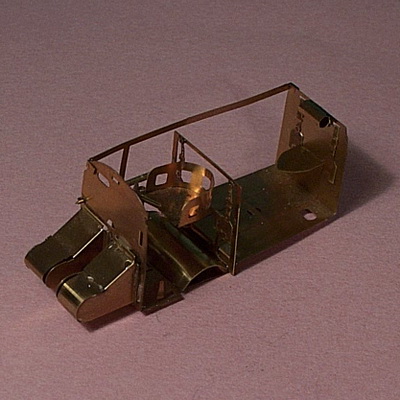 |
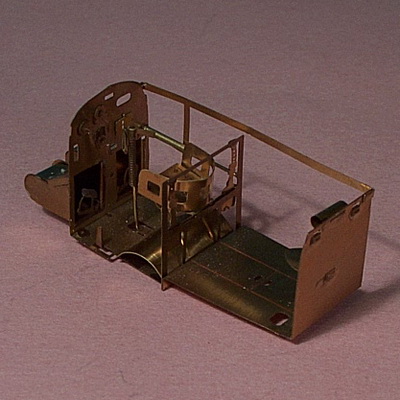
| FUSELAGE INTERIOR: The cockpit interior is built up from the kit's PE component sheet. Only the right side frame is installed and it along with its left side partner will be glued to the interior of the fuselage halves. There are a number of small cockpit components not yet installed and they will be detailed in the next photo frame showing the painted cockpit. | |
|
CONSTRUCTION PHOTO No.
2
13 June 2013
|
 |
|
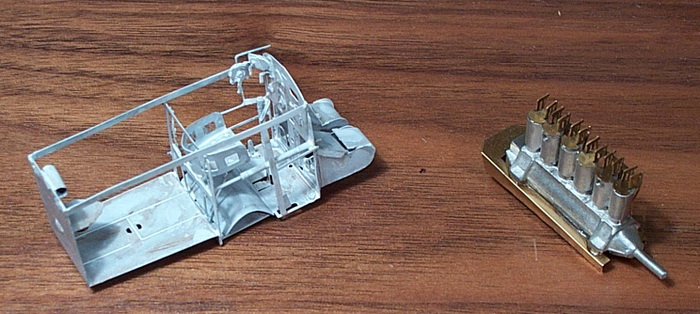
PRIMED COCKPIT INTERIOR AND ENGINE: The
completed PE cockpit module is hand brushed primed using
Model Master TS 1722 White Semi-Gloss Primer. However,
I'm not done yet as more "scratch" detail needs to be added. The kit's engine consists of a white metal crankcase/engine block, two white metal exhausts (not shown), two PE intake manifolds (not visible), six PE rocker arm parts, and the PE engine mounting bracket, all of which are unpainted to shown white metal contrasting with the PE parts. |
|
CONSTRUCTION PHOTO No.
3
29 July 2013
|
|
 |
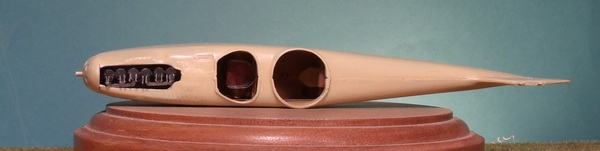
| COCKPIT HALVES JOINED: The completed PE cockpit module and metal/PE engine were pre-painted before installation in the right half of the fuselage. Several dry fitting tests were made to insure fit and alignment and then the two halves were glued together, wrapped in rubber bands, and allowed to dry overnight. The next day, Vallejo's Plastic Putty (ref: 70400) was used to fill in the seam lines and allowed to dry overnight. Then much sanding with a 400 sandpaper sheet knocked down the excess putty and one coat of Misterkit MKGE10 German Clear Doped Linen was brushed on and allowed to dry. The coat of paint was thin enough to reveal the seam lines and any unwanted blemishes which will be sanded down. |
|
CONSTRUCTION PHOTO No.
4
29 July 2013
|
 |
| ONE COAT OF MISTERKIT: The fuselage is explained above in Photos 3a and 3b. The flying surfaces are laid out to show their one coat of Misterkit MKGE10 CDL. The fuselage will be hand-painted with several colors to represent the irregular patches that were hand-painted at the factory to roughly match the pre-printed camouflage fabric of the flying surfaces. This includes the integral vertical fin and the entire lower horizontal tail which were plywood-covered and had factory applied hand-painted camouflage. |
|
CONSTRUCTION PHOTO No.
5a and 5b
19 November 2013
|
 |
 |
|
PAINTING THE FACTORY-APPLIED CAMOUFLAGE: The
fuselage, tail fin, top wing's center
section, and the lower of the two horizontal tail planes were covered in plywood
followed by doped
linen fabric. Over these surfaces, the manufacturer
hand-painted an approximation of the four-color pre-printed
camouflage fabric that covered the remaining flying
surfaces. Just why the pre-printed camouflage fabric
was not doped to the plywood instead of CDL as the outer covering is not known to me.
No two aircraft ever had exactly the same pattern so free-hand is acceptable unless, of course, you have detailed photos of the particular aircraft you are building and you know from the black and white images which colors are applied. Well, that is not possible; that is, one cannot determine colors with certainty from black and white images. I have decided to use MicroSculpt's 1:48 scale four-color pre-printed camouflage decal sheets. I assume that the manufacturer attempted to match the colors as applied on the flying surfaces, both upper and under versions. In the first photo above, I penciled a pattern by drawing larger areas at the front and progressively getting smaller at the tail presumably to match the fabric on the top horizontal tail. I created the following four-color palette for the upper surface/fuselage pattern: Blue-Gray - Vallejo VC0900 French Mirage Blue Dark Green - Vallejo VC0823 Luftwaffe Camouflage Green Ochre Brown - Vallejo VC0824 German Camouflage Brown Ochre toned down with Vallejo VC0921English Khaki. Light Green - Vallejo VC0857 Golden Olive toned down with a little Vallejo VC0921 English Khaki |
|
CONSTRUCTION PHOTOS No.
6a and 6b
20 November 2013
|
 |
 |
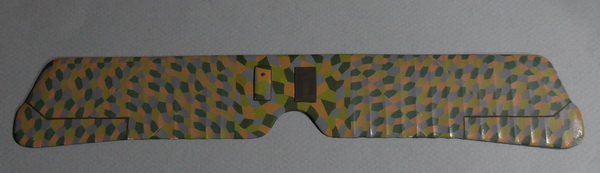
| UPPER SURFACE OF THE TOP WING - The covering on the upper surface of the top wing consists of MicroSculpt decals (MS4804) on the two outer halves and hand-painted camouflage on the center section. The radiator is primed flat Vallejo VC0995 German Gray and will be brushed-finished later. |
|
CONSTRUCTION PHOTO No.
6c
20 November 2013
|

|
|
UNDER SURFACE OF THE TOP WING: I forgot
to take a photo of the underside of the top wing showing the
effect of the hand-painted wing center section.
Obviously, I remembered this but the model was well along by
then. The hand-painted colors are as follows: Pale Pink - Vallejo VC0944 Old Rose (2/3) and VC0989 Sky Grey (1/3) Pale Blue - Vallejo VC0901Pastel Blue Pale Gray - Vallejo VC0884 Stone Grey Pale Yellow - Vallejo VC0912 Tan Yellow (1/2) and VC0953 Flat Yellow (1/2) |
|
CONSTRUCTION PHOTO No.
7
6 December 2013
|
 |
|
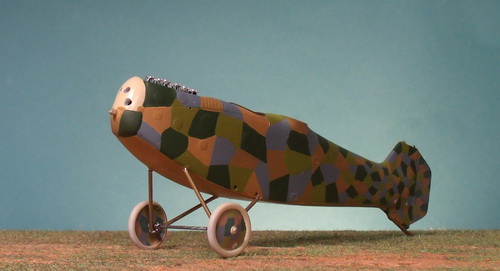
FUSELAGE CAMOUFLAGE AND LANDING GEAR: The
fuselage is finished in its hand-painted scheme. The
rudder has been covered in strips cut from of MicroSculpt's
1:48 scale four-color pre-printed camouflage decal sheet
(MS4804). Each of the he kit's plastic landing gear was substituted by a "V" brass tube with brass rod insert. The axle was glued to "V" notch then wrapped with .010 solder wire to simulate the elastic cord shock absorbers and to hold the axle in place. The wheel centers were covered in camouflage decals and the tire were painted in Vallejo VC0991 Dark Sea Gray with VC0872 Chocolate Brown lining. |
|
CONSTRUCTION PHOTO No. 8
7 December 2013
|
 |
| FUSELAGE DETAILS: Most of the access panels on the fuselage were represented on surface of the plastic without detail. The kit's photo-etch sheet had all of these so it was a relatively simple procedure to cut them from the sheet and apply them over the slightly raised plastic detail with a small dot of super glue. All of these were of sheet metal manufacture and, along with the sheet metal faired landing gear struts, were painted in my mix of German gray-green. Not yet knowing for sure the color of the nose panels, I painted them gray-green also. |
|
CONSTRUCTION PHOTO No. 9
8 December 2013
|
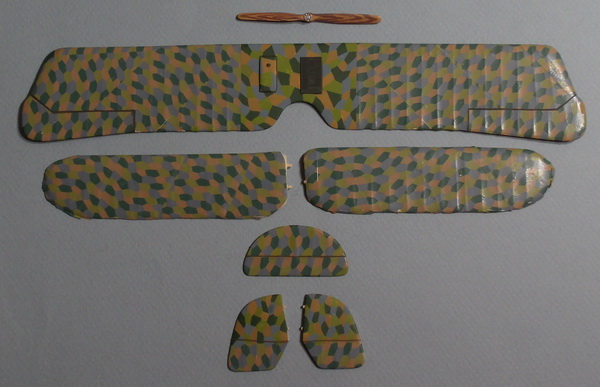 |
| UPPER SURFACE FLYING SURFACES CAMOUFLAGE: The two areas that were NOT covered with MicroSculpt's MS4804 Four-Color Upper decals are the top wing's center section and the horizontal stabilizers of the tail planes lower wing (shown at bottom of photo above). The two areas were hand-painted as described in panels above. Wing covering was at an approximate 45 degree angle but angled to the right on the right wings and angled to the left on the left wings. |
|
CONSTRUCTION PHOTO No. 10
7 January 2014
|
 |
| LOWER WINGS ATTACHED: Each of the lower wings had integral plastic lugs for attachment to the fuselage. These are, to me, notoriously weak in supporting the top wing. I did compromise, however, and cut one of the lugs off from each wing and substituted brass rod. |
|
CONSTRUCTION PHOTO No. 11
11 January 2014
|
 |
|
RIB AND EDGING TAPES:
These necessary decals are tedious to say the least.
I've always had problems applying the tape decals to the
edges and from previous experience,
I decided to hand-paint the edging tape which is what you see above. I
used a mix of Vallejo VC0901 Pastel Blue (3 parts) and
VC0844 Deep Sky Blue (1 part). This formula works for
the specific Techmod TD4405 tape decals I used.
At some time in mid-to-late 1917, pre-printed camouflage fabric became the standard for all aircraft destined to serve on the Western Front. Rib tapes are strips of linen that are doped over every position the fabric was stitched to ribs, edges, and the airframe. The earliest aircraft had tapes in the same material as the covering, so from a distance the aircraft appeared to be entirely clear doped. The camouflage version of the fabric also required taping but the 1917 practice was to apply light blue tape to upper surfaces and salmon pink tape to under surfaces. This is the scheme I applied to model. Later, in 1918, matching camouflage tape was generally introduced for all aircraft and the effect was to provide more concealment. There is a great deal of controversy regarding the colored tapes. Why were these colors chosen? Why is that light blue tape was sometimes applied to the under surfaces and the salmon pike tape to the upper surfaces? Why is it that some so-called light blue and salmon pink tape material was actually darker were substantially lighter or darker? Why didn't the German aircraft industry, from the start, adopt strips of tape cut from print printed camouflage bolts? I'll leave these rhetorical questions unanswered. |
|
CONSTRUCTION PHOTO No. 12
12 January 2014
|
 |
| FUSELAGE IS SMUDGED: I tried several different kinds of Vallejo washes applied by brush but the effect was terrible. I'm not an airbrush user (and maybe I should try) however, I tried a fine black powder (#900 Black) made by FX Weathering Materials. Using a wide soft brush, I applied the powder over the fuselage surface. When finished, I used a soft tissue to remove the excess. The result is pictured above. |
|
CONSTRUCTION PHOTO No. 13
12 January 2014
|
 |
| FUSELAGE IS OVERSPRAYED: My next consideration was to seal the powdered surface. I used an acetone-based matt spray called Prismacolor Matt Fixative used on pastel, charcoal, and pencil artwork. The other surfaces had already been over-sprayed with satin poly. |
|
CONSTRUCTION PHOTO No. 14a
15 January 2014
|
 |
| DECALS APPLIED: The kit's weight table was the only item from that decal sheet used - it was applied just under the pilot's cockpit. It's black script does not show up against the fuselage's dark background. I used Eisernes Kreuzen from my stash (I don't know the decal maker) and applied crosses to the usual eight positions. I made my own aircraft serial number decals C.9280/17. The "C.9280/" part was 12 point Gungsuh font and the "17" was 7 point Gungsuh font. |
|
CONSTRUCTION PHOTO No. 15
15 January 2014
|
 |
| LANDING GEAR AND TAILPLANE DETAILS: The landing gear is braced by a brass rod spreader bar glued just ahead of the axle. The forward landing gear struts are braced by a pair of wires made from .005 monofilament thread to which were added Griffon Models GMBH02 Brass Tube .5mm OD, .33mm ID cut to 3/16" lengths serving as turnbuckles. The top tailplane was braced by two short lengths of brass rod in place of the kit's flimsy PE parts. |
|
CONSTRUCTION PHOTO No. 17
20 March 2014
|
 |
| RIGGING: The original rigging plan was to use Eduard's PE turnbuckles. However, I decided to use short pieces of Griffon Models GMBH02 Brass Tube (.5mm OD, .33mm ID) as turnbuckles along with the Eduard pieces which were glued into pre-drilled holes on the underside of the top wing. I glued one end of each rigging line into a pre-drilled hole on the upper side of the bottom wing. I slipped two brass tube turnbuckles onto the line and secured the other end taut to the Eduard turnbuckle. When dry, I glued one brass tube turnbuckle to each end of the line. The brass was painted with Vallejo VC0863 Gun Metal Grey. |
|
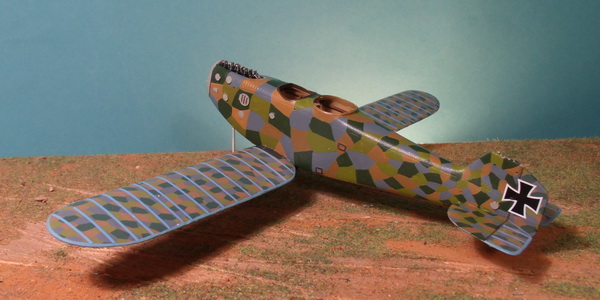
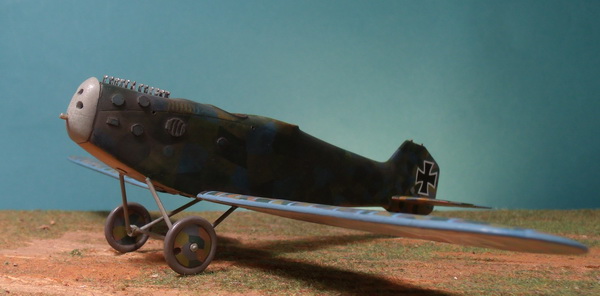
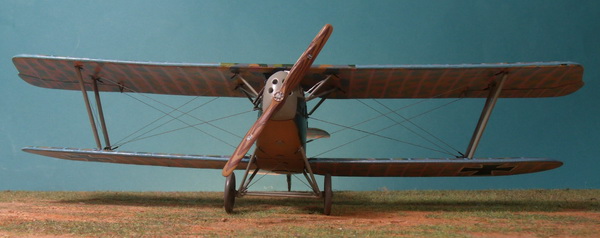
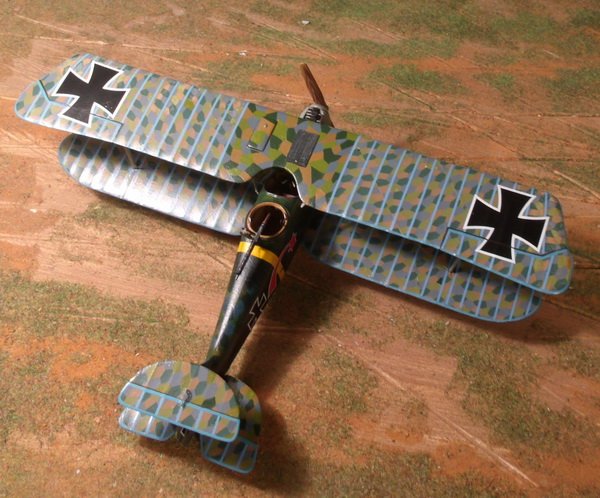
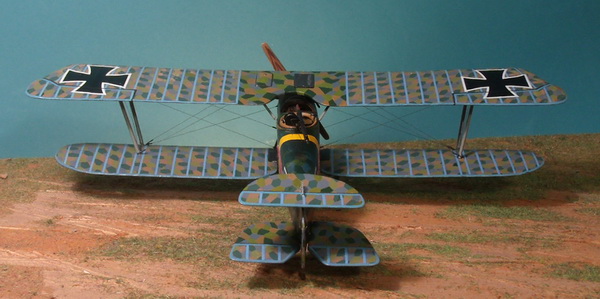
FINISHED PHOTOS Nos. 18a & 18b
9 April 2014
|
|
 |
 |
|
DETAILS TO FINISH: All wing and cabane struts were painted
with my Vallejo mix of German Light Gray-Green, a standard
color for a type of paint used to cover metal, a sort of
precursor to the darker Luftwaffe RLM 02 shade.
The yellow band around the fuselage just aft of the gunner's
cockpit is a decal cut from a sheet of solid yellow decal.
The white-outlined red comet was copied from the image
appearing in Das Propellerblatt cited above. I sized
it down to fit the space available. The original image
was then reversed to make the right-side comet. Three
of each image for backup were inserted into a word document.
A white decal sheet was used to print the images. One
of each was cut out carefully to eliminate any excess decal
transfer. They were watered and placed onto the
fuselage and maneuvered into position, patted dry, and
allowed to stand. Before painting the decals, the
model was over sprayed with one coat of satin polyurethane.
When dry, I hand painted the red portion of the comet using
Vallejo VC0947 Red being careful to preserve the white
outline. The gunners ring was made using Aeroclub's ACV101 German Gun Ring. With a little sanding and using super glue as filler, a nice, sturdy finish was made. Thin brass rod was used for the hand holds on the ring plus the support for the gun itself. The Parabellum machine gun was built up from the PE and plastic parts provided in the kit. |
|
|
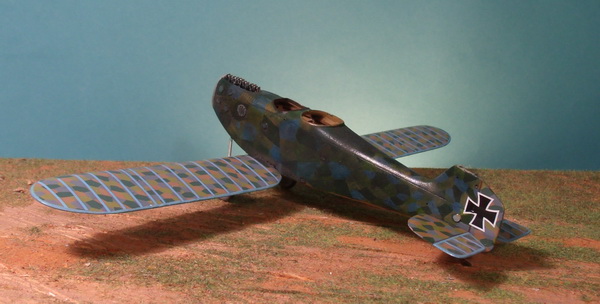
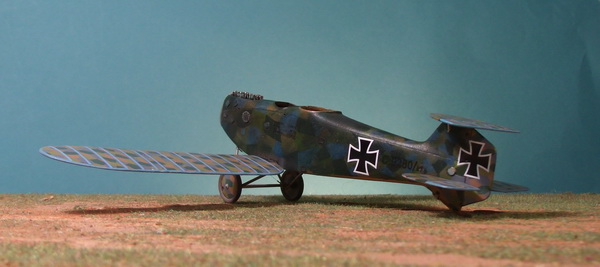
FINISHED PHOTOS
|
|
 |
 |
 |
 |
 |
|
 |
|
-----------------------------------------------------------------------------------------------------------------
Bibliography:
Duiven, Rick and Dan-San Abbott. Schlacht-Flieger! Atglen, PA: Schiffer Military History, 2006.
Gray, Peter and Owen Thetford. German Aircraft of the First World War. London: Putnam & Company Limited, 1962.
Grosz, P. M. Hannover CL.III, Windsock Datafile 23, "Colours and Markings" section by Ray Rimmel, color profiles by Ray Rimmel, scale drawings by Ian R. Stair, cover art Brian Knight, Albatros Publications Ltd, Berkhamsted, UK, revised second edition 1999.
Hamburg, Walther Kerner. Beobachter bei der FA(A) 282 Karl Robert Kerner - Skizze eines Lebens. Munchen: Das Propellerblatt Nummer E1, 2006.
Oppermann, Henning. Flugzeuge bekennen Farbe - Teil 4. Munchen: Das Propellerblatt Nummer M4, 2010.
GO TO?

