|
ISSUE NUMBER 6 |
HISTORICAL MINIATURES BY GEORGE GRASSE |
NOVEMBER 2009 |
HISTORICAL MINIATURES JOURNAL ISSUE NUMBER 6
BY GEORGE GRASSE
BUILDING THE 1:48 SCALE COPPER STATE MODELS GERMAN AEG C.IV OF FA 304b
PURPOSE
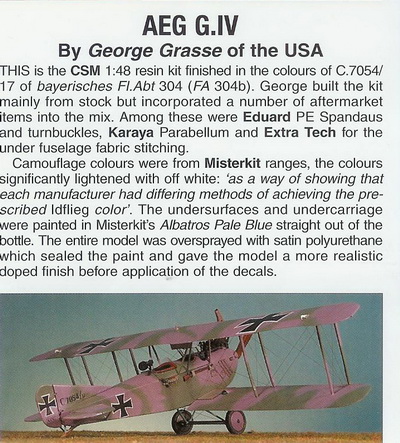
The 1:48 scale WW1 airplane covered in this issue is Copper State Models (CSM) AEG C.IV German two-seat army cooperation general purpose aircraft, specifically C.7054/17 of bayerisches Flieger-Abteilung 304 (abbreviated FA 304b - the "b" stands for Bavarian). The kit is wholly resin except for a packet of mixed resin and white metal parts, a PE German gauge sheet, a PE detail parts sheet just for the AEG C.IV, a Mercedes D.III Motor kit, and a decal sheet which provides the Eisernes Kreuzen plus markings for a German and a Turkish aircraft. The fuselage consists of two resin halves plus a floorboard/cockpit section. The tail unit is in four pieces. The upper wing is two large outer sections with separate ailerons joined by the short center section. Other resin parts include two wheels, propeller, exhaust stack, seats, observer's gun rail, radiators (two, one standard and one tropical), and cockpit components. A number of accessory packs from other manufacturers were used in the construction of this aircraft: Eduard 48327 German Spandau Machine Guns (pilot's), Eduard 48406 Turnbuckles and Control Horns, Karaya 48005 Parabellum Machine Guns (observer's), and Extra Tech 48050 WWI Aircraft Details (for fuselage underside fabric stitching).1
HISTORICAL BACKGROUND OF THE AEG C.IV
The AEG C.IV was a 1915 two-seater design that featured a welded tubular steel airframe throughout. Because of long production lead times and with only 200 ordered by late 1916, the aircraft was already superseded in performance, aerodynamics, and army cooperation capabilities by other C-types produced by Albatros, DFW, LVG, and Rumpler. The AEG C.IV was a rugged aircraft and still well-suited to the rigors of front-line service. All German Flieger-Abteilungen (FA) and Flieger-Abteilungen (Artillerie) aviation units used a mix of different manufacturer's aircraft especially when one particular type was better suited than another for a given mission. Rather than abandon the AEG C.IV entirely, it was decided in January 1917, to award Fokker a contract to build 200 additional aircraft for two reasons: 1) to take advantage of Fokker's production capacity and willingness to develop their steel tube welding expertise, and 2) to significantly improve the production rate.
In June 1917, Fokker was awarded another 200-aircraft contract. The Fokker-built aircraft all proved to be of inferior quality not suitable for front line service. These aircraft were adapted for use exclusively as trainers. Of the 400 Fokker-built AEG C.IVs ordered, only 300 were completed, all as trainers. So, the Fokker story ends here.
The AEG C.IV was powered by the Mercedes D.III 160 hp inline engine and was not suitable for upgraded power plants and became a "dead-end" model. However, the situation on the Turkish fronts, especially Palestine, re-vitalized this type and new orders were placed in April, May, and July of 1917 amounting to 275 aircraft on top of the 200 already delivered from the first and second orders. My research shows that that several "blocks" of an unknown number of AEG C.IV aircraft in the fourth order (May 1917) and fifth order (July 1917) were equipped for tropical service. Among other minor changes, the significant feature of the "tropical" version easy to spot is the enlarged underwing radiator. In fact, 25 aircraft of the fifth order (July 1917) were sold to Turkey. Additional orders for eight aircraft in December 1917 and 12 more in February 1918 were all equipped for tropical service. I believe these "add on" orders totaling 20 aircraft were intended to use up airframes, wings, and other components to clear out AEG C.IV inventory not otherwise planned to be used on the new AEG J.I Infanterieflugzeug. A large number of "spares" packages were probably also produced and forwarded to Palestine. Aircraft still operating on the Western Front were, by now, replaced with improved C-type aircraft. It is possible that some of these might have been refurbished for use as trainers or equipped for tropical service. More than likely, however, many of the first-to-fourth order aircraft were turned in, cannibalized, and scrapped.
The Palestine story is most interesting to me. The tropical version numbered the majority of aircraft from the fifth order (July 1917), some from the fourth order (May 1917) as evidenced by photos 27 and 28 in Windsock Datafile 67, all of the sixth order (December 1917), and all of the seventh order (February 1918). In all, I estimate that 120 (more or less) eventually shipped out to the Turkish fronts, mostly Palestine.2
HISTORICAL BACKGROUND OF THE TURKISH FRONTS
The Revolution or Coup of 1908 by the Party of Union and Progress put Turkey on a collision course with World War I. The Committee of Young Turks (Enver Pasha aged 27 Minister of War; Djemal Pasha aged 36 Minister of Marine, Djavid Pasha Minister of Finance, and Talaat aged 34 Minister of the Interior) effectively displaced the old Ottoman Empire and ruled it as the Turkish Empire. Combatant events in Libya (1911), The First Balkan War (1912), Albanian liberation (1913), and the Second Balkan War 1913, showed that Turkey was deadly serious about maintaining the empire even though her military and economic systems faired poorly.3
The German Military Mission was established in 1913 headed by General Lyman von Sanders whose purpose was to develop the Turkish military forces into a modern 20th Century force on the European model. When was came to Europe in August 1914, Turkey did not immediately join one side or another. Rather, it was inclined to determine first how to expand its empire, where potential "fronts" would be, and which of the two European "camps" had the best prospect of winning. Initially, Germany was doing well on both the Eastern and Western Fronts. Turkey decided to side with Germany and immediately activated ambitious plans on four main fronts: European based at Constantinople - 1st, 2nd, and 5th Turkish Armies (with a eye to action in the Balkans), Caucasus based at Erzinjan - 3rd Turkish Army (with eye to seizing the entire region including what is now Georgia and Armenia but especially the Baku oil fields), Palestine/Arabia based at Damascus - 4th Turkish Army (with the idea of controlling the great Arabian expanse from what is now Syria to Yemen to Saudi Arabia and with a special interest in interdicting the Suez Canal), and Mesopotamia based in Baghdad - 6th Army (securing what is now Iraq and displacing British interests in the Basra oil fields). The Young Turks moved quickly on all fronts except the European possibly held in check by Bulgaria who eventually sided with Germany.
After some early success on all active Fronts, the Turkish armies suffered major setbacks especially in the Caucasus where the 3rd Turkish Army was nearly destroyed. This prevented deployment to Europe because the 2nd Turkish Army was sent to the Caucasus to plug the gap. Two 4th Turkish Army Suez Canal efforts were made. The first in late 1914 was an operation (later reduced to an "expedition" due to Caucasus losses) to plant artillery within range of the Suez Canal. Sufficient forces were withdrawn from the 4th Turkish Army to stabilize the Caucasus that the British forces in Egypt easily turned the Turks back who occupied advanced positions in the Sinai. The second effort by the 4th Turkish Army including elements of Pascha I which were German and some Austro-Hungarian units (mostly artillery and machine gun detachments) and Flieger-Abteilung 300. This force was eventually defeated by the ever-expanding British force at Romani in the Sinai in August 1916. The British never let up and eventually drove the 4th Turkish Army out of the Sinai altogether where the Turks established the Gaza-Beersheba Line in southern Palestine.
During the time of the Sinai experience, the British counter-attacked the 6th Turkish Army in Mesopotamia driving them beyond Kut which was occupied by the British in September 1915. However, a small but effective Turkish force surrounded Kut and forced a British surrender there in April 1916. The fighting in the Caucasus grew with Russian penetrations deep into Eastern Anatolia and both Turkish armies were hard-pressed to hold the line. Of course, the major event of 1915 was the Allied landings at Gallipoli which forced the Turks to withdraw units from the other armies in order to contain the Allies. This desperate campaign consumed nearly all of Turkey's reserves in men and material causing restraint on other Fronts. And, to make matters severe, the Arab Revolt of 1916 turned the Hedjaz Railway from Damascus to Mecca into a serious threat and a further drain on resources.4
GERMAN REINFORCEMENTS AND PASCHA II
The situation for Turkey in the Spring of 1917 was beginning to crumble and Germany decided to intervene. Baghdad was lost in March 1917 and generated a strategic shift in war plans. It was this event that generated a German response to re-capture Baghdad and drive the British out of Mesopotamia and secure the Basra oil fields. To this end, a new Heeresgruppe-Kommando F (Army Group "F") commanded by General Eric von Falkenhayn was authorized by OHL to be organized with two or more Turkish armies stiffened with an all-German unit called Asienkorps (Asian Corps) which included aviation Kofl "F" (Kommandeur der Flieger) consisting of Flieger-Abteilungen 301, 302, 303, and 304b.5 The whole German effort was often referred to as "Pascha II". The Turks insisted that the army group be called "Yilderim" (lightning) in theatre. The original purpose of Yilderim was the re-capture of Baghdad but this goal was unrealistic because of the deteriorating situation on the Palestine Front caused by the build-up of Allenby's army and the lack of a direct rail line from Aleppo to Baghdad meaning that all supplies would have to be trucked, borne by camels, or airlifted. Consumption of supplies and ammunition for an army as large as Yilderim was beyond the capacity of the Aleppo-Baghdad supply line. In March 1918, General Liman von Sanders would become the commander of Heeresgruppe-Kommando F.
PASCHA FLIEGER-ABTEILUNG STRENGTH
The aviation units were organized between July and August 1917 taking volunteer pilots and observers that already had 18 months' flying experience. As to the number of aircraft for each Pascha FA, there are several interpretations:
1) From Das Propellerblatt Nummer 9 (2004), in a article on the aviation life of Rudolf Holzhausen written by Dieter Groschel and Dov Gavish, page II/328, the report that the total of the four Pascha FA units was 40 two-seater reconnaissance and 16 single-seater fighter aircraft for a total of 56. Each Pascha FA would be allocated 10 reconnaissance and 4 fighters. However, the "official" organization a Pascha FA was 6 reconnaissance and two fighters for protection. This left 16 two-seaters and 8 single-seaters in reserve at Armee Flugpark F (AFP F).6
2) In Dirk Rottgardt's German Armies' Establishment 1914/18, Volume 6: Signals and Air Forces, page 73, he says that 2 fighter planes were attached to each of the six FA units serving there (FA 300-305).
3) However, according to Dirk Rottgardt's German Armies' Establishment 1914/18, Volume 4: German Forces in the Middle East, each FA was authorized "9 C plane two-seaters and 9 D plane single-seater fighters". Since FA 305 did not arrive until the Spring of 1918, multiplying these numbers by the 4 Pascha II FA units at this time gives a total of 36 C-Types and 36 D-Types. If you subtract 3 C plane two-seaters and seven D plane single seat fighters to fit the 6/2 formula given in 1) above, and put the rest in reserve at AFP F, you end up with 12 reserve C planes and 28 reserve fighters! Still, that's too many fighters. This simply does not add up to other sources. Rottgardt does give the personnel strength for each Pascha FA which had an authorized strength of 16 officers and 160 other ranks to which were attached about 20 men as supply troops.7
4) Various book authors such as Cron and Imrie (see bibliography), generalize about the six-aircraft establishment of FA and FA (A) units, and, during the late 1917-early 1918 period, upwards of 37 of these units were authorized a nine-aircraft establishment but they are not named. Das Propellerblatt does specifically name FA (A) units in Nummer 5, Deutsche Flieger-Einheiten 1914-1918: Folge 5 - Flieger-Abteilungen, compiled by Reinhard Zankl . Except for five FA (A) Lb, the obvious reason for the increase was the withdrawal of Schustas from escort duty to ground attack duty. This left the local FA and FA (A) units who were supporting infantry divisions on the front line without protection so their establishment was increased to 3 more two-seater aircraft that could accompany aircraft detailed for artillery spotting, local photographic reconnaissance, and Infanterieflug (local infantry support missions, literally "infantry flight"). FA units, on the other hand, are not identified except for the ten FA Lb units. All of this tied in with the Amerika Programme but how did this relate to Pascha II? It only shows that a nine-aircraft establishment was not out-of-place in the Luftstreitkräfte.
5) My conclusion is that each Pascha FA operated six two-seaters if conditions, fuel, spare parts, and the like, were all at peak strength. All of the spare aircraft were at AFP F in Damascus in various stages of repair or readiness. The fighters were soon grouped to form a consolidated Jagdstaffel that eventually operated as Jasta 1F.8
FLIEGER-ABTEILUNG 304b
They traveled to the Palestine Front between August and September. During that movement, as a result of several Allied air raids, Kofl F lost five aircraft in Istanbul and eight more while moving up to Aleppo. In the meantime, Allenby's Fall offensive, Third Battle of Gaza in October 1917, broke the Gaza-Beersheba Turk line and a substantial retreat to the Jaffa-Amman line was made. All of Kofl F arrived at the front during this time and were deployed to bases around Nazareth and went into action in early November 1917.9
Flieger-Abteilung 304b was created (aufgestellt) as a new unit on 23 July 1917 through the facilities of Flieger-Ersatz-Abteilung 1b as authorized by bayerisches Kriegsministerium order Nr. 155109A and 105070A dated 17 July 1917.10 After a period of weeks devoted to collecting personnel, FA 304b was mobilized on 24 August 1917 and made ready for the journey to Aleppo, Turkey, where they would be assigned to a Kofl F Flugplatz (aerodrome). All of the other Pascha II FA units (301, 302, and 303) went through a similar process. Transportation from Germany to Aleppo via Istanbul took nearly two months mostly because of the mismatched and rag-tag nature of the Turkish railway system. By the time FA units began arriving, the Baghdad/Mesopotamian operation was cancelled and the units were now deployed on the Palestinian Front.
By November 1917, Kofl F with headquarters in Nazareth under the command of Hauptmann Hans-Eduard von Heemskerck was now in operation with FA 301 in Jenin, FA 302 in El Afule, FA 303 in Jenin, and FA 304b in El Afule. FA 304b served as the long range reconnaissance unit of Yilderim. Armee-Flugpark F under Hauptmann Erich Steiner with all of the shops and spare aircraft was based at Damascus. All of the fighters were now to be consolidated at Jenin to provide a better umbrella or semi-circle air defense.11
FA 304b had to perform its long-range duties with the now-aging AEG C.IV (it would receive some Rumpler C.IV aircraft later in 1918).12 First casualties that I have found for FA 304b are listed on 8 November 1917 and involved the wounding of both the pilot (Breitenbach) and the observer (Scheler). This unit would have the longest casualty list of the Pascha FA units operating in Palestine from late 1917 to October 1918. Thirty-five listings were found in Casualties13 including ground personnel killed or wounded as a result of Allied bombings. Of air crew, four pilots and one observer were killed. Two pilots and three observers were wounded. Two pilots and two observers were captured. This totals 14 FA 304b aircrew killed, wounded, or captured. The most interesting account of an aerial fight involving an AEG C.IV serial unknown of FA 304b is the Ltn Haugg (P and KIA)/Ltn Hauck (O WIA and POW) that is nicely reviewed in Das Propellerblatt Nummer 7 by Dieter H. M. Gröschel. I could not find much more detail about the activities of FA 304b so a chronology of major events on the Palestinian front as they relate to Pascha II is presented.
CHRONOLOGY14
11 Apr 1916: papers found on an Austrian engineer captured on the Sinai front indicate the arrival of Pascha I FA 300 with 14 Rumpler C.I (probably Hannover-built C.Ia) and a single Pfalz Eindecker for protection.
23 Apr 1916: Turkish-German forces supported by FA 300 make a raid in force across the Sinai, capture Oatuya, then retire.
29 Apr 1916: British forces surrender Kut, Mesopotamian front.
4 Jun 1916: The Sherif of Mecca proclaims independence of Arabs from Turkish rule and forms army.
10 Jun 1916: Sherif Hussein captures Mecca, loses it briefly, recaptures it again 10 Jul 1916. These activities begin a process that strains Turkish military capacity seriously enough to weaken other fronts in order to contain the revolt.
25 Jul 1916: Russians capture Erzikan stabilizing and, at the same time, seriously threatening northeastern Turkey. Again, the Turkish military is under great strain.
5 Aug 1916: Turks are decisively defeated at Romani on the Sinai front, 40 km east of the Suez Canal and retire all they back to Arish.
Summer 1916: The Turkish military, under great pressure from their Central Powers' allies, Germany and Austria-Hungary, send fairly large contingents to fight in the Balkans and Eastern Front, mostly to relieve German units that can conduct offensive operations against Rumani which has just declared war in favor of the Allies. Yet more strain on the Turkish military. Turkey is now deeply involved in Mesopotamia, the Caucasus, the Balkans, the Eastern Front, Palestine, and Arabia.
25 Nov 1916: the British defeat Turks at Maghaba driving them completely out of the Sinai.
11 Dec 1916: Decisive Arab victory at Yembo.
25 Feb 1917: British recapture Kut in Mesopotamia.
11 Mar 1917: British recapture Baghdad in Mesopotamia. This is the single incident the caused the implementation of the Pascha II program that led to the creation of Heeresgruppe F and FA 304b among others.
26 Mar 1917: British attempt a frontal assault against the Turk Gaza/Beersheba line in southern Palestine but are repulsed. Also known as 1st Gaza.
6 Apr 1917: United States declares war.
20 Apr 1917: British attempt another assault on the Gaza/Beersheba line and are repulsed. Also known as 2nd Gaza. This is another significant event and it changed the Palestinian front in favor of the Allies with the replacement of General Murray with the legendary General Allenby.15
26 Jun 1917: The German OHL formerly adopts the "Amerika Programme". Germany, too, is beginning to fell the strain on its military.
2 Jul 1917: Heeresgruppe F or Yilderim is created to have two Turkish armies plus a German component the equivalent of a reinforced infantry division known as the Asienkorps supported by four FA 301-304b (Kofl F) with the objective of re-taking Baghdad.16
Fall 1917: Yilderim's Baghdad objective is abandoned and the formation is ordered to establish operations on the Palestinian Front.
31 Oct 1917: Allenby breaks through the Gaza-Beersheeba line known as 3rd Gaza.
28 Dec 1917: Turks sign cease fire with Trans-Caucasus republics of Armenia, Azarbayjan, Georgia, and the Russians.
21 Feb 1918: Allenby takes Jericho.
31 Mar 1918: Allenby defeated at 1st Amman.
3 May 1918: Allenby defeated at 2nd Amman.
18 Sep 1918: Allenby launches a third attempt aimed at Megiddo which ultimately results in Turkey giving up the war in October 1918.
MAP OF THE SINAI-PALESTINIAN FRONT 17
|
|
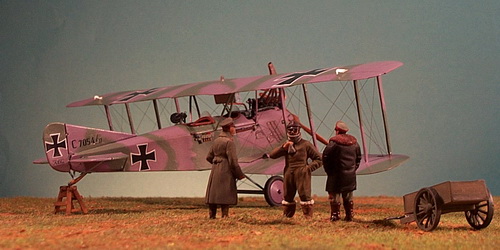
AEG C.IV C.7054/17 RESEARCH
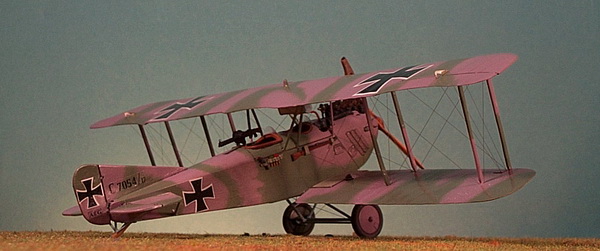
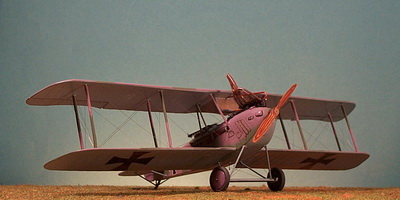
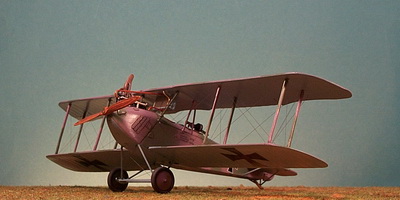
My 1:48 scale model is based on two photographs that appear in Windsock Datafile 67 and Over the Front Volume 22 Issue 3. This AEG C.IV of FA 304b was fitted with a movie camera and shows two aviators in the observer's cockpit. Dan-San Abbott did a nice three-view color drawing of this aircraft including his interpretation of the 2-color "green and lilac" camouflage pattern. I reviewed his drawing against the photos and determined that he interpreted the dark shade as "lilac" and the lighter shade as green. I believe that it is the opposite only because lilac has more blue and gray in it which seems to return a lighter shade than dark green. At any rate, that is the basis for my scheme. I significantly lightened the two colors by adding off white to represent the fading of colors and the fact that manufacturers colors probably varied widely.
As can be seen by the large number of end notes and long list of bibliography, I spent a great deal of time researching the AEG C.IV and the Palestinian Front. The best source for photographs is Windsock Datafile 67 by P. M. Grosz. Unfortunately, the Palestinian Front is not well-represented photographically and evidence of Pascha II FA units and the definitive serial numbers they flew are not available except for the few I found. In terms of numbers of AEG C.IV aircraft in the front line inventory, the Frontbestand table below compares it with the total of all C-types starting in February 1917.
Frontbestand for the AEG C.IV Compared to Total C-Types 1917-18 a
|
Type |
1917 |
1918 |
|||||||||
|
Feb |
Apr |
Jun |
Aug |
Octb |
Dec |
Feb |
Apr |
Jun |
Aug |
Oct |
|
|
AEG C.IV |
90 |
124 |
127 |
63 |
88 |
68 |
40 |
26 |
29 |
34 |
n/a |
|
All C Types |
1561 |
1557 |
1966 |
2061 |
1821 |
1797 |
1475 |
1611 |
1528 |
1610 |
n/a |
|
AEG % of Total |
5.77 |
7.96 |
6.46 |
3.06 |
4.83 |
3.78 |
2.71 |
1.61 |
1.90 |
2.11 |
n/a |
Frontbestand Notes
| a | Data from WWI Aero volume 107 (for C Types), Dec 1985 |
| b | Pascha II FA units equipped with the AEG C.IV |
CONSTRUCTION
1) I have relied on Windsock Datafile 67 AEG C.IV (WDF067 for short) by Peter M. Grosz and the kit's drawings prepared by Martin Digmayer for construction details. Note that most of the construction steps have photographs that appear on another of my pages: click here to view my AEG C.IV construction process. I always prep the kit by detaching the resin parts, trimming and sanding them so their ready for assembly. Don't forget to put these parts in zip lock bags so you don't lose them.
2) Fuselage Prep: the fuselage is in two halves but before they can be glued together, there is the consideration for adding cockpit parts supplied in the kit plus all of the other details that can be added based on some pretty good close up photos in the WDF067. The kit includes formers, pilot seat, cockpit floor board with gas tank (on which the pilot seat is attached), and main instrument panel. I added a number of panels, boxes, gauges, and cables for the pilot and a like number of "gadgets" for the observer including bomb rack, camera, work table for the wireless key and map holder, bench seat, spare Parabellum ammo drums, wires, cables, boxes, and more. Fuselage interior sides were painted in pale beige to represent the unpainted side of the fabric covering. Formers, floorboard, and observer's bench were painted in a wood color. The floorboard was "streaked" a bit to show some wear. I added seatbelts made from strips of lead foil and bits of configured fuse wire to look like buckles. These were painted an off white. I test fitted the floorboard assembly every step of the way to make sure that an added component on the fuselage interior did not interfere with the fit. The two fuselage halves and the floorboard subassembly were set aside for now.
3) Engine Compartment: the Mercedes D.III 160 hp engine consists only a an crankcase, cylinder block, intake manifolds, the overhead cam subassembly, and rear cam assembly. All of these were cleanly cast in resin and went together quickly. I cleaned up the exhaust stack and did a little pre-fitting and found that drilling out the exhaust manifolds will help set the exhaust stack in place at the end of the project. I did not glue it since it would be in the way when cabane struts, wings, rigging, and radiator pipes were to be installed. The crankcase was painted in a white metal color using Vallejo Natural Steel mixed with a little Vallejo Gloss Black. The cylinders were painted a dark metal color almost black using Vallejo Gloss Black mixed with a little Flat Black and Gray Gunmetal. The engine's fuselage cavity was the same color as the crankcase to simulate the interior of the metal panels. I test fitted the engine between the two fuselage halves which was fine except I noticed that a firewall between the engine and pilot was needed. I made a former out of plastic and painted it a wood color.
4) Fuselage Assembly Continued: I checked out the floorboard cockpit sub-assembly and the engine one more time and when satisfied that I could do no more that could be seen, I glued them to one side of the fuselage fitting the other side to make sure things were lined up. When the super glue was dry, I glued the other side of the fuselage, checked for alignment, and wrapped them gently in rubber bands to dry. After the fuselage sides were firmly bonded, I applied putty to gaps and, when dry the next day, sanded using a progression of grit sand paper from 100 to 600 until smooth.
5) Tail Unit: the tail unit comes in four pieces: vertical fin, rudder, left horizontal stabilizer and elevator, and right horizontal stabilizer and elevator. The horizontal stabilizers and elevators were set first and allowed to dry making sure they were level. The vertical fin was second and it was plumbed. When dry, the rudder was attached. These steps are a balancing and alignment art form using super glue.
6) Tailskid: The kit's tailskid was substituted for one made of flattened brass tube for strength. It enters a cavity in the tail and is glued into a hole I pre-drilled. The tail skid is integrated with the rear pair of underside horizontal stabilizer struts. First, however, there is a small tailskid strut attached to the rear of the fuselage. This was made from small diameter brass rod. I then pre-drilled two small holes on the underside of each horizontal stabilizer and two more on the the side of the fuselage at the bottom per the Ian R. Stair drawings in WDF067. I cut and test-fitted each strut then glued them in place. Then, I pre-drilled small holes for the rudder control horns and holes into the fuselage where the control wires pass. Monofilament thread was used as control wires. There are no control horns for the elevators because the mechanism is actuated inside the rear of the fuselage using the steel tubing of the elevator frame as the axis.
7) Landing Gear: the kit's landing gear substituted for flattened brass tubing. Each "V" strut was soldered using two of these brass pieces cut to length. I made a photo copy of the page and placed the struts in the correct position on the page. Each strut was polished and brushed with flux then soldered in place. Enough solder runs to the other side to form a solid bond. I cut then sanded off the sacrificial copy paper. Next, I cut a piece of brass rod for the axle long enough to also incorporate the unique AEG axle springs for each wheel. I left enough axle to take the wheels. The axle and springs were super glued to the "V" struts with axle resting at the bottom of the "V". I test fitted the completed landing gear sub-assembly, made a few bends, and a few cuts. I trimmed the ends so the struts were slightly longer than the drawing so I would have about 1/8" of tapered brass that would fit into holes on the bottom edge of the fuselage. When I was satisfied of the fit and level, I super glued the landing gear sub-assembly in place being careful to keep it level while drying by using "props" on both sides of the fuselage to hold things in place. Lastly, I made four "turnbuckles" from copper fuse wire, pre-drilled the holes, and set them in place. I pre-drilled four tiny holes in the landing gear springs and ran .005 monofilament thread for the two sets of landing gear wire by putting a small amount of super glue in the hole and on the thread and simply inserted them. When dry, I ran each thread through the "turnbuckle", made a knot, applied glue, added a weight, flipped everything over to dry with the weights keeping the threads taut. Cut of the excess and add two spreader bars parallel with the axle and the landing gear is done.
8) Lower Wings: The first things to do with the lower wings is to drill out the rigging and strut holes. In the case of the lower wings only, I drilled the rigging holes through the wing so that the monofilament thread that will be secured to the upper wing can be passed through and glued using weights. Second thing to do is to I locate the position of the lower wings in relation to the bottom of the fuselage. I made pencil marks across the fuselage onto the corresponding wing so I could drill holes already lined up. I used two brass rods per lower wing. The hard part was setting the wings in place. I did not take into account the relationship of the cabane strut positions relative to the leading edge of the lower wing and had to reposition the pins to get that correctly lined up. There is a slight stagger of the upper and lower wings and this has to be exact. Finally, the pins, holes, and lower wings were lined up properly and I glued them in place using props to keep the wings balanced with a slight dihedral.
9) Upper Wing Assembly: three parts of the upper wing had to be glued together because I need the completed wing to test fit the cabane struts coming up in the next step. I used brass pins to connect the pieces and props to get the dihedral. When dry, I drilled out the rigging and strut holes being careful not to drill through the upper wing. Any filling between the wing joints was done and cleaned up.
10) Cabane Struts: Again, I used flattened brass tubing to make my own cabane struts for extra strength. Since the upper wing in my procedure goes onto the cabane struts first, I have to have a sturdy structure. The AEG C.IV has single cabane struts forward and an inverted "V" strut aft. Because the aft strut is at an acute angle, I couldn't bend a single piece of brass to make it; so, I made two pieces and soldered them at the right angle. I used the Stair drawings to test the finished product. Two were made. I glued them into position and immediately two U-shaped struts, one for the left side and one for the right side. The bottom of the "U" is the actually the top of the cabane strut and fits into a recess in the center wing panel. It took a lot of fiddling with shape, strut lengths, and strut angles to get a correct but strong trestle. The left and right struts were soldered together. Enough spread allowed for adjusting the widths of the struts to fit the fuselage. Nonetheless, it was a difficult process. This sub-assembly was then glued to the fuselage. The assembled upper wing was test fitted to make sure the cabane struts projected the correct stagger which is quite minimal. You don't want a backward stagger as in the AMC de Havilland DH.5. There are two cris-crossing pairs of cabane strut wires for which I made four copper fuse wire turnbuckles and glued them under the top wing adjacent to the cabane strut attachment points. These will be strung after the top wing is mounted.
11) Propeller: this was supplied in the kit as an a single resin piece. This was sanded down a bit to clean it up and primed with Andrea's Ochre. I painted several laminated strips using Andrea's Dark Brown. When dry, I started my colored pencil application using seven colors ranging from pale yellow to dark brown. I just streak one color at a time along the propeller from tip to tip. Then I rub it down between colors. This combines the oils in your fingers with the wax in the pencil to smooth out the demarcation between colors. So, I start with a light color and end with a dark color. Sometimes I add more or less of a color. When all done I added a nice prop boss from Copper State Models' prop boss PE sheet (sold separately).
12) Preliminary Painting: At this stage, it was necessary to begin the painting process in anticipation of attaching the upper wing. This means that the upper surface of the lower wing and the under surface of the upper wing have to be fully painted because it is quite difficult to paint through a maze of rigging wires. First, I decided to lighten the camouflage colors of lilac and dark green. I used a couple of clean Vallejo bottles, added Misterkit MKGC05 Albatros Dark Green to one and Misterkit MKGC02 Albatros Mauve to the other. To each, I added about one fourth of their volume of Misterkit MKGC16 German Off White. I made a painting worksheet from Ian R. Stair's drawings in WDF067 for my own personal use. I studied Dan-San Abbott's color drawing and the photos of AEG C.IV C.7054/17. Using my trusty colored pencils, I made the appropriate camouflage patterns on my worksheet and from that painted the upper surfaces of both wings, the fuselage, and tail unit upper surfaces. This "scratch" coat was brushed on with some dabbing to wash out where the two camouflage colors joined. Later, I did a second "finish" with a lot of dabbing to simulate the sprayed-on look. The underside of the fuselage, wings, and tail unit were given one "scratch" coat of Misterkit MKGC03 Albatros Pale Blue. I over-sprayed the model with polyurethane clear satin.
13) A Few Decals are Added: I decided to jump ahead a get decals on the fuselage. I used the kit's Eisernes Kreuzen on the fuselage and rudder. I made my own decals for the weight table, serial number, and AEG logo on the bottom of the rudder and oversprayed them with polyurethane clear satin when dry.
14) Windscreen: I managed to remember the windscreen before the upper wing was attached. It was a scratch-built from a piece of clear plastic as used on grocery store vegetable containers. I guessed at the curvature of the fuselage and the arc of the windscreen using a small pair of scissors then glued it into place.
15) Upper Wing Preparation: this step involved gluing all of the .005 monofilament rigging wires into the pre-drilled holes on the underside of the upper wing. I did three or four wires at a time and let them set up before doing more. A small amount of super glue is placed in the hole. Each rigging wire is held with small tweezers, dipped in a pool of super glue, and placed in the hole. When all are in place, the underside of the wing is a jumble of fine "wires" but otherwise ready for mounting the upper wing to the cabane struts. I used the kit's larger "tropical" radiator and glued it in position after pre-drilling for radiator pipes to be added later.
16) Upper Wing Mounting: this was an easy step. A little super glue to the holes and to the ends of the cabane struts and the wing fitted nicely.
17) Wing Struts: The kit's struts were not used and I made my own from brass tubing. The process is tricky because I insert and glue a telescoping piece of smaller diameter brass rod into the top and bottom of the cut-to-length strut. The smaller brass rod is cut-off to about 1/16" and it's this piece that is actually seated into the strut holes. Then I flatten the brass tube to make the strut. The ends of the flattened strut need to be nipped a bit because they flare out and you want a tapered look to resemble the actual strut. They were primed and then painted the lilac color. I'll go back and add the dark green later.
18) More Wing Work - the Struts: the inboard wing struts were glued to the bottom wing first and then to the top wing. I keep checking for alignment. These struts worked out well. When dry, I glued the outboard struts to the bottom wing and then to the top wing all the while holding both wings in place carefully until the super glue sets up. Of course, alignment was critical but the small pins at the end of each strut helped to secure the wings and made for a good bond.
19) Interplane Rigging: wing rigging starts on the inside at the cabane struts and ends on the outside near the wingtip. I try to do no more than four wires at a time letting the glue set up under the weight of metal clips dangling from the ends of the wires. For each wire, I pass it through its proper hole in the bottom wing, apply a dot of glue from the underside, and attach a metal clip for weight. Two to four wires are at a time starting at the cabane struts. When thoroughly dry, it only takes a few minutes, I move to the other side and glue corresponding set. When dry, I remove the clip and cut them flush with a sharp X-Acto blade. When the wires are glued in place, I start the process of filling holes on the underside of the bottom wing. While that's drying I rigged the cabane strut wires.
20) Aileron Control Horns and Rigging: The kit's PE sheet had the aileron control horns. The drawings and photos show two wires, one at each end of the control horn. Both wires go down to the inspection panel at the foot of the forward outboard strut. For the AEG C.IV there were 24 interplane strut wires, 4 cabane strut wires, 4 aileron wires, 4 landing gear wires, and 2 rudder control wires for a total of 38 wires.
21) Radiator piping and Exhaust Stack: now that all of the rigging wires are done, it was time to finish up connections for the engine. Radiator pipes were scratch-built and shaped using brass rod and following WDF067 and kit drawings. I installed these and painted them copper. I painted the engine's intake manifolds white to simulate asbestos taping. Next, I worked on the exhaust stack. The exhaust ports were opened up with my twist drills in ever increasing size until I had the right diameter. I started the fitting process with the rear pipe, cutting and trimming as necessary. This caused the next pipe to be cut and trimmed. At this point I glued these two in place. The resin exhaust is thin and reasonably pliable. When dry, I could see that the third stack needed trimming. I worked my way forward trimming and gluing as I went. Next thing I knew, it was done. I painted the overall stack a dull orange and then washed it with the same dark orange to which was added dark gray metal and a little gloss black.
22) Details Added: While researching the photos in Windsock Datafile 67 AEG C.IV, I would write down a detail to consider during the building process and identify the photo and/or drawing that best shows the detail. For this model I identified 31 important details not to be overlooked. Some have been mentioned in the construction steps above. Others are flare pistol, flare cartridge rack, slung Mauser rifle, Parabellum machine gun (Karaya), Spandau machine gun (Eduard), brass fuel line from the wing tank down the left forward cabane strut, trailing antenna wire for the wireless sending apparatus, nameplate right side of engine panel, two windscreens, and under fuselage fabric stitching (Extra Tech).
AEG C.IV C.7054/16 CAMOUFLAGE COLOR SCHEME
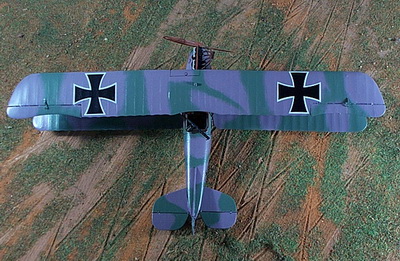
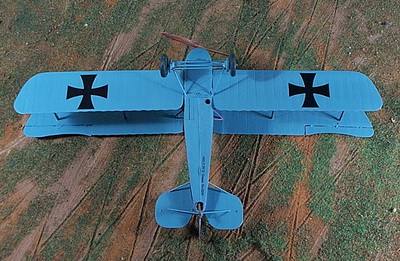
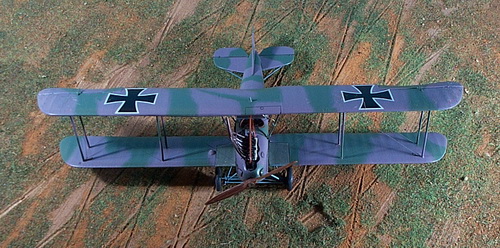
In 1916 the German Air Service employed a number of camouflage schemes specified as to colors but left the pattern up to individual manufacturers. The dark green/red-brown/light green color scheme was dropped in early 1917 and in its place came, what I call, the "lilac" period which used a combination of dark green and lilac (or mauve, as some call it). Again, the pattern was left to the manufacturer and there were a number of variations including deviations in the actual shades of lilac and dark green. AEG adopted a sprayed, random patch-work pattern not seen on any other German aircraft. In fact, no two AEG C.IVs were alike even though similar in a general way. This pattern covered all upper surfaces of the wings, tail unit and the fuselage including fuselage sides and wing struts. The under surfaces were pale blue the exact shade of which probably varied between production batches and will never be known for sure.
To achieve the sprayed on look, I had to patiently dab the edges of the two colors while still wet. This sequence describes hand painting the final coat over the scratch coat. The upper wing is a good example of how I did it. I started at the left wingtip and painted the lilac patch using my lightened version of Misterkit Albatros Mauve. While still wet and with another brush I painted good part of the adjacent dark green patch. The dabbing brush was quickly started up and down the demarcation line between the two colors so as to blur them and simulate the spray painting look. I worked my way across the wing left to right keeping the paint wet for dabbing.
Final painting was tedious. Cockpit coaming, tires, struts, control horns, radiator pipes, and so forth. Refer to the paint color table below. Note that both upper surface camouflage colors were significantly lightened with off white as a way of showing that each manufacturer had slightly different methods of achieving the prescribed Idflieg color. The underside of the fuselage, wings, tail plane, and landing gear painted using Misterkit Albatros Pale Blue straight out of the bottle.
The AEG C.IV photos I used seemed to show a distinct pattern of wing and cabane strut camouflage painting. Basically, where the strut touched the lower attachment point on the wing or fuselage, I painted its lower half in that color and the upper half in the other color. Except for wood colors for the propeller, floorboard in the cockpit, visible fuselage formers, and tailskid, there are no other colors except a red brown for the cockpit coaming and dark gray for the tires. I should mention that the cockpit coaming for both the pilot and the observer were first painted in a red brown and then washed in a darker brown. The entire model was oversprayed with a satin polyurethane. This seals the paint and gives the aircraft a more realistic doped finish. It is absolutely necessary to do this before applying decals.
PAINT COLOR SWATCHES USED ON MY AEG C.IV C.7054/17
 |
Misterkit MKGC05 Albatros Dark Green (significantly lightened with MKGC16 German Off White) |
 |
Misterkit MKGC02 Albatros Mauve (significantly lightened with MKGC16 German Off White) |
 |
Misterkit MKGC16 German Off White (used to mute the two colors above) |
 |
Misterkit MKGC03 Albatros Pale Blue |
 |
Vallejo Acrylic Mix of VC0907 (Light Pale Blue Grey), VC0885 (Pastel Green), and VC0866 (Grey Green) |
 |
Andrea ANXC18 Slate Grey (for the tires) |
 |
Andrea ANXC50 Leather Brown (cockpit coaming) |
 |
Andrea ANXC49 Dark Leather Brown (cockpit coaming) |
 |
Model Master MA4622 White Primer (for brass struts) |
AEG C.IV C.7054/16 MARKINGS
This aircraft was not marked other than the Eisernes Kreuz in the traditional eight positions. I used the kit's Eisernes Kreuz markings for the wings, fuselage, and rudder. The photos I used as a reference showed the serial number clearly enough for me to reproduce it as a decal. Also clearly shown is the AEG logo at the bottom of the rudder, also reproduced as a decal. I could not make out a weight table but made a decal anyway and that appears on the left side of the fuselage just below the pilot's cockpit opening.
I used the kit's Eisernes Kreuzen for all eight positions. On the underside of the fuselage, I added a small decal identifying my work, "AEG C.IV G. Grasse No. 6259". The number "6259" is the sequential numbering of the miniatures I have built over the years. Ninety-nine percent of the 6,259 miniatures built are military museum-quality figures that I paint and sell to private collectors. As of this writing, I am up to 6,377!
AEG C.IV C.7054/17 FINISHED PHOTO GALLERY

THIS MODEL APPEARED IN WINDSOCK WORLDWIDE, VOL. 26, NO. 2, March/April 2010
![]()

I------------------------------------------------------------------------------------
FOOTNOTES
1 The Eduard Spandau guns are exceptional all-PE engineering wonders. I don't bother painting them except for a few brass components. Although expensive, the Karaya Parabellum guns are quite good. They are a combination of PE and resin. The Extra Tech WW1 components have a little of everything.
2 All of this information came from Windsock Datafile 67 AEG C.IV. P. M. Grosz points out the lack of welding equipment to repair these aircraft and this was a factor. More importantly lack of spare parts, Allied bombing and strafing raids, and accidents caused the vast majority of loss and damage.
3 A excellent and brief account of the Young Turks is found in David L. Bullock's Allenby's War (see bibliography). The attitude of the Young Turks during the course of the whole war was "pie-in-the-sky" strategy. Although the ideas were somewhat sound given the objective of empire-building, the logistical system made it virtually impossible to support their goals. The road and rail system was especially poor.
4 A good overview of the war regarding Turkey is Alan Axelrod's World War I, one of those handy quick-reference "Idiot's Guide". There are several sections that, when put together, give the reader an idea of Turkey's strategic position and the Allied response. Another is a more detailed account of German involvement with Turkey during the course of the whole war and written from the German point-of-view is General Limon von Sanders' Five Years in Turkey. Von Sanders was initially head of the German Mission to Turkey beginning in 1913 and assumed command of Yilderim (Heeresgruppe F) in the Spring of 1918. See also General Ernest von Hoeppner's account of Pascha II on pages 103 and 121.
5 According to Das Propellerblatt Nummer 3, FA 305 was created on 10 November 1917 per K.M. Nr.1684 and mobilized on 3 December 1917. It could not have reached the Palestinian Front before February 1918. Dates, airfields, and actions for this unit are not known except for five entries in Casualties of the German Air Service 1914-1920, the earliest being 17 May 1918 and the latest 15 Sep 1918. Another source, Pilot Fazil Bey Turkish Aviation Hero, makes reference to this unit as operating with Turkish aviation units in protecting the Hedjaz railway in eastern Palestine and Jordan. My guess is that this unit reinforced the Turkish 4th Army.
6 The authors did not intend to explain exactly how the aircraft were to be distributed. I added "official" in the sense of the standard FA/FA(A) structure of six aircraft as seen on the Western Front in mid-1917 although many would be increased to a nine-aircraft establishment later in the year.
7 See Rottgardt's study, pages 54-56 which includes the Army Flying Park (Armee Flugpark). It seems that Rottgardt took this data directly from German sources but did not factor in the distribution of aircraft between each FA and AFP F. See also Rottgardt's Volume 6 that details aviation formations and their authorized aircraft strength.
8 Das Propellerblatt Nummer 7, page 1/251, footnote 6 and 7. The time frame is early 1918. There is also a reference to the Albatros D.III fighters that then being organized into a permanent "Staffel" instead of each pair of fighters remaining with each FA. In the end, this somewhat mysterious formation went by several names: Jagdstaffel 1F, Jagdstaffel 300, Jagdstaffel Felmy. It appears that Jasta 55 was packed off to Palestine shortly after it was mobilized in early 1918 only to have its pilots assimilated into Jasta 1F. I haven't spent much time on Jasta units so readers must pursue this unit's history on their own.
9 Das Propellerblatt Nummer 9, pages II/328 to II/330. Although the article concentrates on Rudolf Holzhausen's experiences with FA 303, the authors have included much information about the movement of the Pascha FA units from Germany to Palestine including rail transport difficulties and air raids.
10 Das Propellerblatt Nummer 3, ibid, page 124.
11 Das Propellerblatt Nummer 7, ibid, page I/251, footnote 6.
12 Das Propellerblatt Nummer 9, ibid, page II/332 has a photo of a Rumpler C.IV serial unknown of FA 304b in early 1918 Balkenkreuz markings.
13 Casualties of the German Air Service 1914-1920, Norman Franks, et al. And, yes, I checked every entry. In fact, a great number are entered in my relational data base for future personal use.
14 The Great War 1914-1918 - Chronology of Events of World War I, Cross and Cockade (US), various volumes and issues covering the period 1916 to 1918. These older volumes are available on CD-Rom through the League of WWI Aviation Historians, publishers of their journal Over the Front, at http://www.overthefront.com/.
15 Three outstanding books on the events from Allenby's appointment in June 1917 to the end of Turkey's involvement in WWI in October 1918 1) Bryan Perrett's Megiddo 1918, 2) David L. Bullock's Allenby's War and, 3) General Liman von Sanders' Five Years in Turkey (from the German point of view). See bibliography for details.
16 See von Sanders, pp. 174-178.
17 Middle East, Map Link, Santa Barbara, 1998.
BIBLIOGRAPHY
Axelrod, Alan. World War I. Indianapolis: Macmillan USA, Inc, 2000.
Bullock, David L. Allenby's War: The Palestine-Arabian Campaigns 1916-18. London: Blandford Press, 1988.
Cron, Hermann. Imperial German Army 1914-18. Solihull, West Midlands, UK: Helion & Company, 2002.
Flanagan, Brian P.; Smith, Frank; and Raidor, Lonnie. The Great War 1914-1918 - Chronology of Events of World War I: Cross and Cockade (US), various volumes and issues covering the period 1916 to 1918. Cross and Cockade (US).
Fliegertruppe website 21 Feb 2009, www.fliegertruppe.de
Franks, Norman; Frank Bailey, and Rick Duiven Casualties of the German Air Service 1914-1920. London: Grub Street, 1999.
Franks, Norman; Frank Bailey, and Russell Guest. Above the Lines. London: Grub Street, 1998.
Groschel, Dieter H. M, Ein Verlust der bayerischen Flieger-Abteilung 304 an der Palästina-Front 1918, Das Propellerblatt Nummer 7, 2003.
Groschel, Dieter H. M. and Div Gavish. Rudolf Holzhausen - Weltkriegsflieger, Dipolmat, und Historiker. Das Propellerblatt Nummer 9, 2004.
Grosz, Peter M. Windsock Datafile 67 AEG C.IV. Berkhamsted, Hertfordshire, UK: Albatros Publications, Ltd., 1998.
Imrie, Alex. Pictorial History of the German Army Air Service 1914-1918. Chicago: Henry Regnery Company, 1973.
Hoeppner, Ernest, General von. Germany's War in the Air. Nashville, TN: The Battery Press, 1994.
Nicolle, David. The Ottoman Army 1914-18, Osprey Men-at-Arms Series No. 269. London, UK: Osprey Publications, Ltd 1994.
Nikolajsen, Ole. Pilot Fazil Bey Turkish Aviation Hero, Over the Front Volume 22 No. 3. Journal of the League of World War I Aviation Historians, 2007.
Perrett, Bryan. Megiddo 1918: The Last Great Cavalry Victory, Osprey Campaign Series No. 61. Botley, Oxford, UK: Osprey Publications, Ltd 1999.
Rottgardt, Dirk. German Armies' Establishment 1914/18, Volume 4: German Forces in the Middle East. West Chester, Ohio: The Nafziger Collection, Inc., 2007.
Sanders, Liman, General von. Five Years in Turkey. Nashville, TN: The Battery Press, 2000.
Shores, Christopher; Norman Franks, and Russell Guest. Above the Trenches. A Complete Record of the Fighter Aces and Units of the British Empire Forces 1915-1920. London: Grub Street, 1990.
WWI Aero, volume 107 (for C Types), Dec 1985
Zankl, Reinhard. Deutsche Flieger-Einheiten 1914-1918: Folge 3 - Flieger-Abteilungen. Das Propellerblatt Nummer 3, 2002.
|
|
|
Eduard 1:48 Aviation Militaire de France Mecanicien and Nieuport 16 |
GO TO?

.jpg)